Using an RV sewer hose is essential if you are road-tripping in a self-contained motorhome. At some point, you are going to have to get down to some nasty business and dump those black and grey water-holding tanks. You’d be hard-pressed to find someone who thinks this part of RVing is fun, but the process doesn’t have to be messy or time-consuming.
Check out this guided search to figure out the best RV rental for you to try out so you can learn the ropes before you buy.
RVs For Rent Near You
How an RV Sewer Systems Works
Unlike many homes where waste just flows into the city sewer system once you flush your toliet, RV sewage is held in a tank until it is ready to be dumped. Your RV most likely has three types of tanks: freshwater, greywater, and blackwater.
- Freshwater tank: You fill the fresh water tank with potable water. It’s what comes out of faucets, showers, and toilets.
- Grey water tank: Used water from your sinks and shower end up in the grey water tank.
- Black water tank: The black water tank holds sewage. If your RV doesn’t have a grey water tank, the water from your sink and shower will end up here too. The RV sewer hose is used to dump the black and grey water tanks.
To get rid of the waste from the tanks, you’ll take your RV to an appropriate dumping station, which are typically found in most commercial campgrounds, state parks, and national parks. Never attempt to dump sewage down drain pipes or in the wilderness.
How frequently your tank fills up depends on how big the tank is and how often you’re using the restroom. If you have a large tank with only two campers, you probably won’t be dumping it as often as a large family whose RV has a smaller tank. As a general rule of thumb, however, you should wait until your tank is at least two-thirds full before dumping. When the tank is full, the pull of gravity helps to empty it out.

How to Use an RV Sewer Hose to Dump the Black Water Tank
Not sure how to dump your tank using the RV sewer hose? It may be gross, but it isn’t as hard as you think.
Pro Tip: Use Gloves
What you are about to do deals with gross grey water from your shower and sinks and raw sewage from your RV toilet. It isn’t fun and can be a health hazard, so do yourself a favor and use gloves whenever you handle the hose or mess with any of the connections and caps.
Step 1: Check Sewer Valves
Make sure the RV sewer hose valves are closed. Yep, there’s a cap on the RV side, but make sure you have all the waste RV sewer hose valves shut before attempting to take it off. If you take that cap off with the valves open, you are in for a surprise.
Step 2: Connect RV Sewer Hose
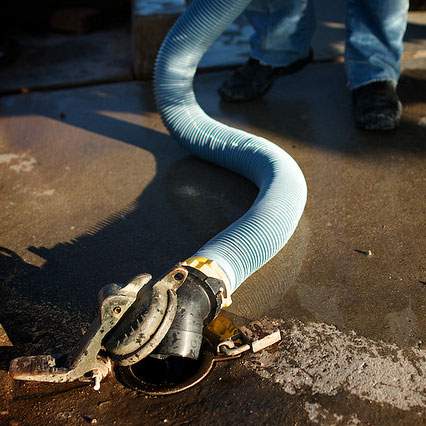
Most RV sewer hoses have bayonet-style fittings and generally make a tight seal. Connect one side to the RV waste fitting, and extend the hose to the dump station’s inlet. Make sure to use an elbow fitting that fits snug and deep into the dump station opening. You may need to use a soft sewer gasket depending on the dump station and location.
Step 3: Drain the Black Water Tank
This is an important step. You’ll want to make sure that you open the black water tank valve slowly. Depending on how full your tanks are, you can expect there to be a good pressure surge as sewage enters the hose and makes its way to the dump station. Keep an eye on the elbow going into the dump tank for leaks, raw sewage shooting into the air, etc. Allow the tank to completely drain, giving it adequate time to trickle out at the end of the process. Close the valve.

Step 4: Drain the Grey Water Tank
After you’ve drained out the black tank and closed the valve, you can slowly open the grey water tank valve. Doing the grey water after the black water tank helps wash away all that raw sewage from the hose. Just like the black tank process, keep an eye on things for leaks. Allow for things to fully drain.
Step 5: Close the RV Sewer Waste Valves
At this point, you can go ahead and close both the black and grey water tank RV sewer hose valves. Be sure to look for any leaks from the valve itself, too.
Step 6: Disconnect RV Sewer Hose
Twist to disconnect and pop the cap back on the waste valve.
Step 7: Spray Down, Clean Up
At most places, there is a non-potable water hose – use that to spray down inside your sewer hose while it is still connected to the dump station. After that, remove the elbow from the dump station and spray it down, too. Spray down the concrete that surrounds the dump station. You want to leave it as clean as possible for the next person.
Step 8: Put Everything Away
Most RVs have a pipe or area designated for the RV sewer hose. Stow everything away where it belongs, keeping it out of contact from other stuff that may be in the same area.
Step 9: Disinfect
Remove gloves and throw away. Most dump stations have a trash can for used gloves. Use hand sanitizer as a precaution. As an extra step, you can use a spray disinfectant on the sewer valves and hose connections.
Conclusion
Now that wasn’t so bad, right? Now you’re ready to get back on the road or back to your campsite.
If you’re looking to get other dirty work out of the way, read these helpful tips for how to clean your RV awning.


